
 Main subject: Art
related subject: Math, Languages, Art, ICT, Crafts, Project-based learning
Duration: 80 minutes.
Age groups: Age 11, Age 12
Submitted by: Kaire Kollom-Vahtra, Estonia
Learning objectives:
*The student knows the names of the tools and materials needed for embroidery. *The student is able to plan his embroidery work with the help of a digital tool. *The student is able to save his/ her work and send it to the teacher. *The student is able to find solutions to technical problems. *Consolidate and strengthen knowledge through on-the-job training *Work individually and cooperation with others
Implemented digital tools:
Google search engine Video viewing environment (youtube.com) Web-based software LearningApps.org Web-based pattern creation program https://www.stitchfiddle.com Google Forms
Supported digital competence for student:
Information and data literacy, Communication and collaboration, Digital content creation, Problem solving
Elaboration of the competences:
1.Information and data literacy by searching for tools and materials with their correct names or keywords and searching for pictures of them in the internet using Google search engine 1.Information and data literacy by learning the names of tools and materials and passing the test in the LearningApps environment 2.Communication and cooperation by interacting and helping each other. Student’s learn by watching, doing and collaborating. Knowledge of how to use smart device or tablets 3.Digital content creation by planning, creating and saving their/students embroidery work (for example as a picture) and sending it to (or sharing it with) the teacher. The final outcome is student’s own creation. 5.Problem solving by making the right decisions, for example, if the smart device does not have a QR-code reader, then install it by themselves (or ask for help from the teacher).
Preparation:
1.The teacher prepares a sample that can be shown to the students to see what kind of work he or she expects from the students 2.The teacher looks for an environment (such as LearningApps) to assess students’ knowledge and create a test or game. Teacher must have an account in this environment, students do not need an account (they use the link) 3.The teacher looks for a web-based environment (such as https://www.stitchfiddle.com) that students can use to create their own embroidery pattern and create a guide for using it. 4.Teacher creates QR codes for games and websites, prints them out and places the class in a visible place 5.The teacher prepares the smart devices for the students, checks that everything is available and working 6.The teacher prepares questions for feedback, which the student can answer both orally or in writing (or using GoogleForms) 7.The teacher makes agreement with the students on how their design/ pattern or picture of their work will be sent to the teacher.
introduction
The teacher explains the assignment to students: what are they going to do and what to look out for. The teacher needs to use an iPad/a tablet or a computer with internet and a projector.
Implementation:
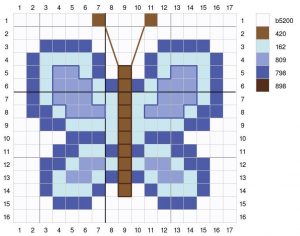
1.The teacher shows how to use Google search engine and students can find information about tools and materials with their correct names or keywords for embroidery and searching for pictures of them in the internet by using Google. 2. After summarizing the results and a short discussion, the teacher gives the students the QR-code and asks them to solve the game in LearningApps. 3. The main topic of the lesson: Planning a work and your design using a digital tool. Discussion with students: How to plan embroidery work? What tools can be used for planning? What about creating a digital pattern? Collaborative discussion that someone wants to embroider (themes, pictures, volume). Is the work affordable to you and can it be completed in 7 weeks? Draw a draft on paper with colored pencils. 4.Task: Embroidery Design: Use your draft and create a pattern for your embroidery using tablets and the digital environment at https://www.stitchfiddle.com or use a QR-code. They can use their imagination and creativity when they design it. The teacher is in the classroom to support the students and guide them if needed. 5.The students save their work and submit it/ send it to the teacher. 6.Students give feedback about the lesson and the tasks to the teacher. Students can answer both orally or in writing by using GoogleForms).
Conclusion:
1. Students show the class their designs and describe in a few words what they did and why they chose this particular pattern. 2. Patterns created by students are printed out and students can use them in their embroidery work 3.At the end of the lesson students provide feedback on their progress. Each student can reflect on their result, which was easy and what was difficult.
Implemented needed devices:
Teacher need computer with internet connection and projector to show the picture/text on the wall. Each student need an iPad or other smart device with internet and QR-code reader.